How to Smoke a Turkey!
Fully illustrated, easy and great tasting!
 So it's your turn to cook the turkey, and everyone's raving about
flavorful, moist, smoked
turkey... but you've never smoked a turkey, or you're
worried about Aunt Jane and Uncle Phil and the rest of the McCracken family
complaining that it is too dry, overcooked or undercooked? Wondering how long to thaw or cook it?
How to know when the turkey is done? Fear
not, following these directions ANYONE can cook a perfect smoked turkey dinner for
Thanksgiving, Christmas or any occasion! These direction with ANY type of
smoker, The Big Green Egg, Weber, Brinkmann, Masterpiece, whatever type of
grill/smoker you have.
So it's your turn to cook the turkey, and everyone's raving about
flavorful, moist, smoked
turkey... but you've never smoked a turkey, or you're
worried about Aunt Jane and Uncle Phil and the rest of the McCracken family
complaining that it is too dry, overcooked or undercooked? Wondering how long to thaw or cook it?
How to know when the turkey is done? Fear
not, following these directions ANYONE can cook a perfect smoked turkey dinner for
Thanksgiving, Christmas or any occasion! These direction with ANY type of
smoker, The Big Green Egg, Weber, Brinkmann, Masterpiece, whatever type of
grill/smoker you have.
Ingredients and Equipment
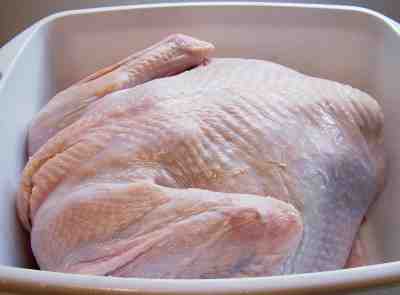
- Turkey - uncooked, frozen or fresh, with or without neck and giblets, with or without broth injected, brined or unbrined - note: you can now get organic and kosher turkeys - at about double the price - but without any hormones!
- Herbs: Thyme, sage, marjoram, paprika, rosemary, pepper
- 2 medium onions or one large onion
- Smoking wood - about 10 lbs for a 20 lb plus turkey, 5 lbs for a 12 lb or less turkey. I prefer hickory, Texans like Mesquite, for a light flavor use apple, cherry or peach. The pellets work great, too; you can get them at most big box storsd, too.
- Meat thermometer. I prefer a remote instant digital thermometer, since you do note need to open the lid (which lets out heat) and you can stay inside your house and monitor progress!
- Smoker - these cylindrical smokers are usually available Home depot, Lowes, and WalMart for under $30. Come brands are Weber, Brinkman and The Big Green Egg.
- Water to fill the water pan.
- Fuel: I place a Brinkman, MasterChef or Weber smoker over a Bayou brand propane fryer base, so I can control the heat exactly and never need to refuel while cooking. Some people use an electric base and fans of dust and carcinogens use charcoal! :) More power to you if you like charcoal, but it is a mess and you cannot control the temperature. Whichever, you'll need enough fuel to last 6 to 12 hours. It can vary a lot, depending upon how cold the turkey was and outside temperature.
- Heavy duty meat forks and oven mitt or gloves.
- Roasting pan or a huge pot or bowl to carry the cooked turkey back into the house.
Note: start early! At 190 - 210 F in the smoker, it always seems to take about 11 or 12 hours for a 20 to 22 lbs turkey to reach 165 F
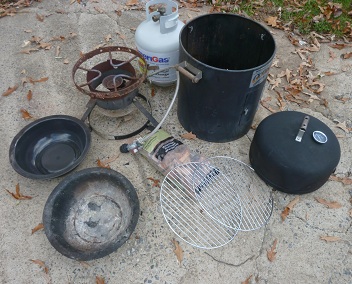
Step 1- Gather the smoker and other equipment
Get all the parts out and be sure to work on a fireproof surface, away from the house and anything flammable.
 Step
2 - Soak the wood
Step
2 - Soak the wood
Now is a good time to get your smoking wood soaking in water. But which wood? I prefer hickory, the traditional standard, but Texans often like Mesquite and there are others like apple, pecan and cherry. The last three woods have a very mild flavor though, and I find I get best taste with hickory. Whichever you use, you want to soak it in water for a few hours so that it smokes rather than simply burns!
Step 3 - Thaw the turkey
If you bought a frozen turkey, you must thaw it before preparing or
cooking it! There are always directions for thawing on the bag,
but basically, there are two methods:
- 1 to 5 days in the refrigerator or
- submerged in cold water for about 3 - 6 hours (depending on
the size of the turkey). It is safer to thaw it in the fridge, since
it is always kept before below 40 degrees F, but sometimes, there just isn't time.
If you thaw it under water, be sure to change the water every 30 minutes or so. Make sure you keep the entire turkey under water. Parts expose to air will warm to room temperature, and bacteria can grow!
THAWING TIMES FOR A TURKEY |
||
| Turkey Size (lbs.) | Refrigerator (Days) | Cold Water (Hours) |
| 8-12 | 1-2 | 4-6 |
| 12-16 | 2-3 | 6-8 |
| 16-20 | 3-4 | 8-10 |
| 20-24 | 4-5 | 10-12 |
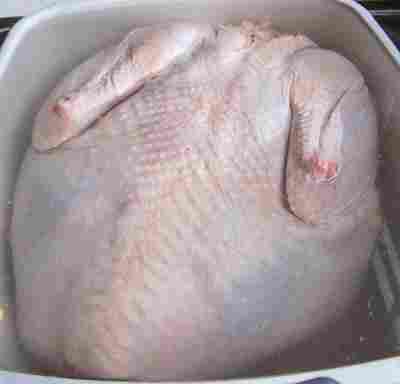
Step 4 - Empty and clean the turkey
 Remove any neck and giblets that were stuffed inside the turkey - be sure
to look in BOTH ends - often they put a gravy packet under the neck skin
flap, and the giblets are inside the bird. You can save these and smoke
them, too, if you wish. I'll pass...
Remove any neck and giblets that were stuffed inside the turkey - be sure
to look in BOTH ends - often they put a gravy packet under the neck skin
flap, and the giblets are inside the bird. You can save these and smoke
them, too, if you wish. I'll pass...
Thoroughly wash the turkey inside and out with cold water (nothing else) and drain it. Note: this is a good time to get the oven warming - set it for 325 F (and make sure there is nothing inside the oven first!)
Remember that uncooked poultry usually have bacteria like salmonella, so thoroughly wash your hands, and pots, tools, or surfaces that come in contact with the uncooked turkey. Use hot soapy water and rinse a lot on nonfood items (your hands, pots, etc.).
Step 5 - Gather the seasonings
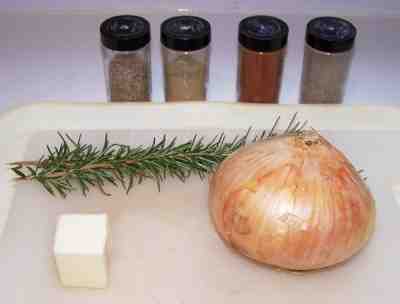 The seasonings are easy:
- 1 teaspoon Thyme
- 1 teaspoon Sage
- 1/2 teaspoon Marjoram
- 1/4 teaspoon Paprika
- 1/2 teaspoon dry Rosemary, or 2 sprigs fresh.
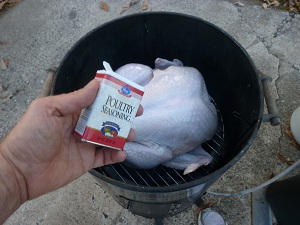
Or if you're not the Martha Stewarty type... you can just use 2 tablespoons of "Poultry Seasoning", it's premixed. You'll find it in the herbs and seasoning rack at the grocery store.
Dice the onion(s) - I do about 1/4 inch squares but anything from 1/2 inch slices or smaller is fine. Place the cooking bag in the cooking pan and line the inside of the cooking bag with the onions.
Step 6 - Stuffing the turkey?
Nope,
definitely not a good idea in a smoker. It makes it harder to ensure that the turkey is
cooked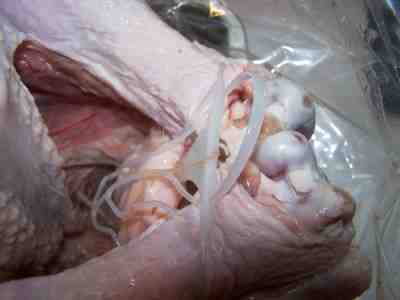 completely, and the stuffing absorbs the blood and other fluids and
insulates the bacteria in them from the heat. If the stuffing is
not cooked and handled properly,
foodborne illness
could occur. I cook the stuffing in a separate covered pan and add cooked
juice from the turkey to it!
completely, and the stuffing absorbs the blood and other fluids and
insulates the bacteria in them from the heat. If the stuffing is
not cooked and handled properly,
foodborne illness
could occur. I cook the stuffing in a separate covered pan and add cooked
juice from the turkey to it!
I'm adding a separate page about how to make the stuffing / dressing!
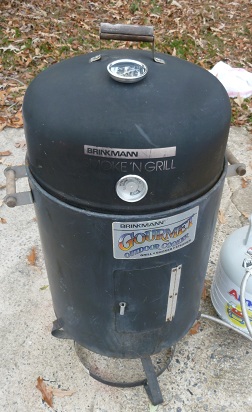
Step 7 - Clean the smoker
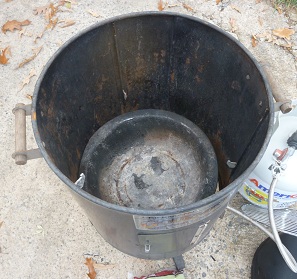
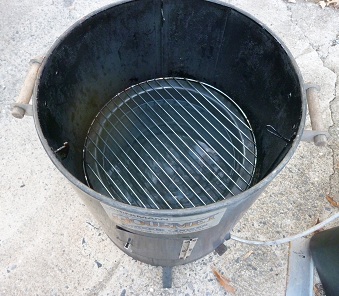
Here's a picture of a simple Weber / Brinkman smoker. Smokers typically come
in 3 varieties: charcoal, electric and propane. I take the basic inexpensive
($40) Brinkman or Weber charcoal smoker and place it over a turkey fryer base, which
makes it a propane fryer. The advantages of propane or electric over
charcoal are that you can control the heat precisely, you don't need to keep
adding charcoal, and they operate cleaner, with no dust or carcinogens
from the charcoal. But whatever your choice, clean it out with a scrub
brush and garden hose. I clean the grates inside with s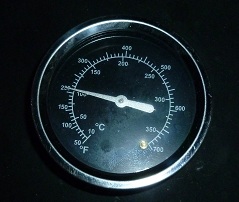 teel wool, as that is
the only part that will come in contact with the turkey.
teel wool, as that is
the only part that will come in contact with the turkey.
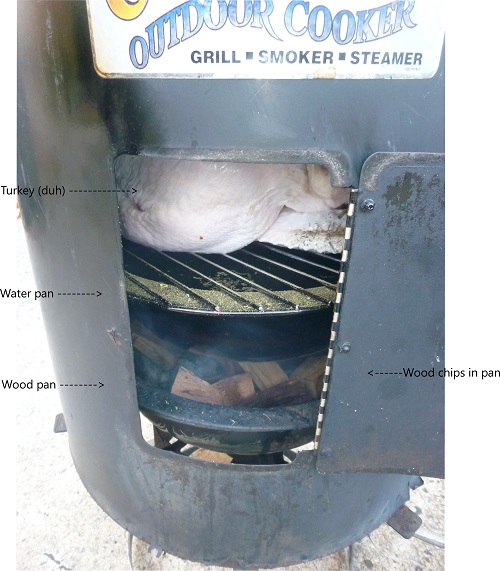
The photo at above right shows all the parts; clock wise, starting with
the 2 metal grates, then the wood pan which goes in the very bottom right
above the heat source, then the water pan, the propane burner base, the
propane tank, the smoker cylindrical body and the lid. You'll notice I
drilled a hole in the lid and added a precise dial type thermometer
(available from Home depot or Lowes) as the built in dial (warm - ideal -
hot) seems too imprecise to me.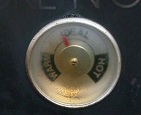
Step 8 - Assemble and start the smoker
Assembly is easy:
- Simply put the cylinder over the heat source base (charcoal, gas or electric),
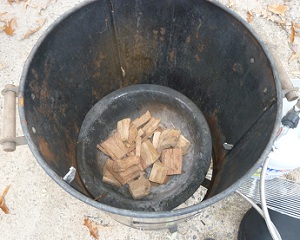
- Put the wood pan or tray in, place a few chunks of wood in the pan,
- Then put the water pan in (empty). After the water pan is installed, fill it with water, up to about 1.5 to 2 inches from the top. You may need to top it up with more water later.
- Place a grate or rack on the bottom shelf, usually right on the water pan. Next put the lid or cover on the smoker and fire it up. You can wait until after you put the turkey in, but this may save 10 or 15 minutes, and it doesn't get hot so quickly that you would have trouble putting the turkey in.
Heat sources, again:
As I said, I prefer using a propane turkey fryer base,
(like the
Bayou brand in on the
Amazon box at right) set under
Brinkman charcoal smoker (which you can often find on sale at WalMart or Home
Depot), with the
charcoal base removed.
It burns clean,
the heat can be controlled precisesly,
one full 20lb propane can burn
for 10 hours or more, and is safer,
particularly if you use a braided
steel hose to connect.
And in the years since I started doing this, the manufacterers have started making propane-powered smokers. The Pit Boss, for example, gets very good reviews and is all you need.
But, some people use electric smokers, which aside from the potential risk
of
using it on a rainy day, are also safer than charcoal. I've found
electric smokers to be slower to heat up, and the elements will eventually
fail.
Charcoal... I just don't like it.
There is the risk of cancer
associated
with the soot, starting with lighter
fluids can be dangerous
and you
must continually add more charcoal
over the 4 to 7 hours while
you
are using the smoker. But, again,
it is your choice, and charcoal has
the cheapest initial cost.
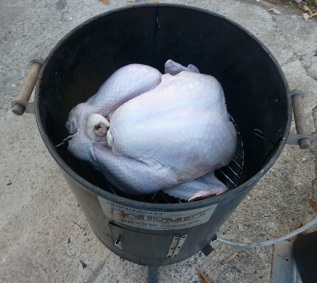
Step 9 - Put the turkey in the smoker
Once you have the smoker assembled, remove the lid and set the turkey place on the rack.
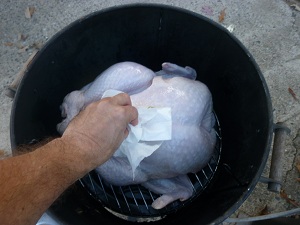
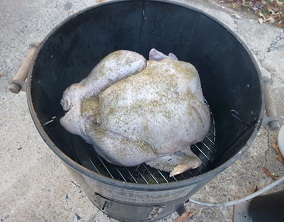
Step 10 - Season the Turkey!
Brush with oil (I use peanut oil) or melted butter to prevent drying of the skin and help it to become a golden brown. I just pour a few tablespoons of oil on the turkey, then use a paper towel to spread it evenly all over the top half of the bird.
Sprinkle the seasonings from step 5 all over the bird, especially inside the cavity. Peel and cut the two onions in half, then pop them into the turkey's cavity!

Don't forget wood for the smoker! I prefer Hickory for the traditional smokey flavor, others like mesquite!
Click here for related items on Amazon
Click here for related items on Amazon
Click here for related items on Amazon
Click here for related items on Amazon
Next insert the meat thermometer into the thickest part of the meat. See the guidelines below. I like to use 2 thermometers, a remote thermometer in the breast and a standard dial type thermometer in the thigh. Insert an oven-safe meat thermometer into the deepest part of the thigh. (If using an instant-read thermometer, it will be inserted when it is time to check for doneness.) You can smoke the giblets, neck, liver, etc. also if you want to, but since they are so small, you may want to wait until only 2 hours of cooking time remain, before you put them on, and cook to 170 F. Or cook them on the stove. Or give them to the dog...
Use the roasting schedule in the table below as a guideline; start checking for doneness a half-hour before recommended end times. A smoker usually operates in the temperature range of 185 to 215 F, so it takes longer than in your oven at 350 F!
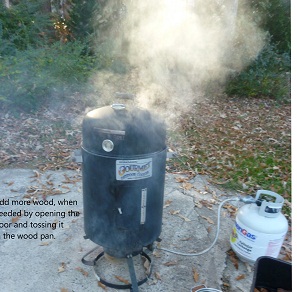
As the turkey cooks, you will need to add more wood chips / chunks.
Usually I add 4 or 5 pieces ever 30 minutes. You'll probably need
about 10 lbs of wood altogether for a large 20 - 25 lbs turkey, 5 lbs for a
small 8 - 12 lb turkey. It's not an exact science, so it is better to
have too much wood, rather than too little. Just use the extra next
time.
Obviously, you want to keep the smoker operating in the ideal temperature range. If you are using propane or electric, just periodically check that the flame or heat hasn't gone out, and that the smoker is operating in the ideal range (185 F to 215 F). If the temperature rises much above 215, that may mean that you have either run out of water (DON'T let that happen) or your wood has caught fire. If the latter, use a spray bottle of water to quench it without creating too much dust.
If you need add more water to the water pan, just take the lid off, and carefully fill the pan from above, to one side of the turkey.
APPROXIMATE ROASTING TIMES FOR TURKEY |
||
| Size of Turkey (lbs.) | Timing (approximate ONLY!) | |
| 8-12 | 33/4 to 4-1/2 Hours | |
| 12-14 | 4-1/2 to 5 Hours | |
| 14-18 | 5 to 5-1/2 Hours | |
| 18-20 | 5-1/2 to 6 Hours | |
| 20-24 | 6 to 7 Hours | |
Turkey is done when the meat thermometer reaches the following temperatures:
180 to 185 degrees F deep in the thigh; also, juices should be clear, not pink when
thigh muscle is pierced deeply.
170 to 175 degrees F in the thickest part of the breast, just above the rib bones.
160 to 165 degrees F in the center of the stuffing, if turkey is stuffed.
Most authorities are now saying that once all parts of the turkey reach 165 degrees F,
it is safe to eat. 180 degrees F is a pretty dry turkey, so if you test in the
three place above and all are at least 165 degrees F, it should be ready! I usually
pull it out at 170 degrees F and it is plenty moist and safe.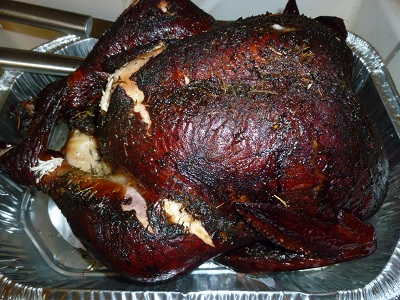
ALWAYS count on it taking more time, rather than less. If your smoker is finicky, you get a late start, or open it frewquently (which cools it down) it can easilty take 1 or 2 hours longer than the table above indicates. And you want to let the meat "rest" for about 20 minutes after you remove it. So, if you want to eat at 3 pm and you have a 20 lb turkey, I would start it smoking at 7 am.
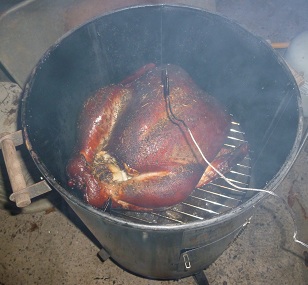
Step 11 - Remove the cooked turkey
When the skin is a golden color and the thermometer reads the right temperature from step 7, take it out of the oven! Don't be surprised if the turkey is a dark brown, or even almost black - you SMOKED it! It will still be moist and juicy, as long as you didn't let the water pan run dry!
Let turkey stand (rest) for 15 to 20 minutes before carving to allow juices to set. While the turkey is setting, you can make the gravy!
Step 12 - Make the gravy
How, I hear you ask, can you make gravy without drippings. No... you do not use the water in the pan in the smoker. Really? Were you actually thinking of doing that. Ugh. No, just get some chicken broth (or turkey broth, some stores sell that now) and use that in place of the pan drippings that you would have had from an oven turkey. This has the advantage of making a fat free gravy, too. And it will still taste great! Click here for the gravy directions!
Step 13 - You're done!
Within two hours after roasting, remove stuffing from turkey and carve the meat off the bones; then store in refrigerator or freezer. Gravy, stuffing and meat need to be stored SEPARATELY from each other. Wrap turkey slices and stuffing separately.
Refrigerator Storage: Use within three days.
Freezer Storage: Wrap in heavy foil or freezer wrap or place in freezer container. For optimum taste, use stuffing within one month and turkey within two months.
- Looking for simple apple pie directions ?
- How about a pumpkin pie made from a fresh pumpkin, squash, or canned pumpkin?
- And for even more detailed turkey instructions see Clemson University's page!
Reference
| Gas mark | Fahrenheit (�F) | Celsius (�C) | Gas mark | Description |
| 1 | 275 | 140 | 1 | Cool |
| 2 | 300 | 150 | 2 | Cool |
| 3 | 325 | 160 | 3 | Moderate |
| 4 | 350 | 180 | 4 | Moderate |
| 5 | 375 | 190 | 5 | Moderately hot |
| 6 | 400 | 200 | 6 | Moderately hot |
| 7 | 425 | 220 | 7 | Hot |
| 8 | 450 | 230 | 8 | Hot |
| 9 | 475 | 240 | 9 | Very hot |
Write if you need any help!
For Easter egg Hunts, Children's Consignment Sales, Local Farm Markets and other types of Farms, click here.
Find Other types of farms:
- Farm markets and roadside stands
- Road trips and camping resources
- Home canning supplies at the best prices on the internet!
- Maple Syrup Farms, sugarworks, maple syrup festivals
- Environmental information and resources
- Consumer fraud and scams information
- Farms For Your Event for birthday parties, weddings, receptions, business meetings, retreats, etc.
- Pick Your Own fruits and vegetable farms
- Festivals - local fruit and vegetable festivals
- Local Honey, apiaries, beekeepers
- Local Meat, Milk and Eggs
Get the
most recent version of
the Ball Blue Book